How to safely clean an acrylic bathtub: tips for perfect results
Acrylic bathtub: A spotless bathroom improves both comfort and hygiene, and an acrylic bathtub requires especially careful maintenance to stay brilliant. Acrylic is popular because it looks modern, feels warm to the touch, and is light enough for easy installation and renovation projects. The trade-off is sensitivity: the glossy topcoat scratches easily, turns dull, and may yellow when exposed to harsh chemistry. Incorrect routines, like scrubbing with powders or using bleach, can damage the finish in a matter of months. This guide explains safe, effective methods for cleaning an acrylic tub at home, detailing suitable products, step sequences, stain and mold removal, and long-term care, as reported by G.business.
What makes acrylic care special
Acrylic is a polymer plastic protected by a thin, glossy layer that provides shine but also raises sensitivity to abrasion. Unlike enamel or cast iron, acrylic does not tolerate scouring powders, stiff brushes, or high heat. Strong acids, chlorine, ammonia, alcohol, and solvents can etch or cloud the finish, leading to permanent haze. Even paper towels can cause micro-scratches over time, so soft microfiber is the safer choice. Colored cosmetics may leave pigments, and stagnant water can create limescale and soap film. Understanding these vulnerabilities is the foundation of a safe cleaning routine.
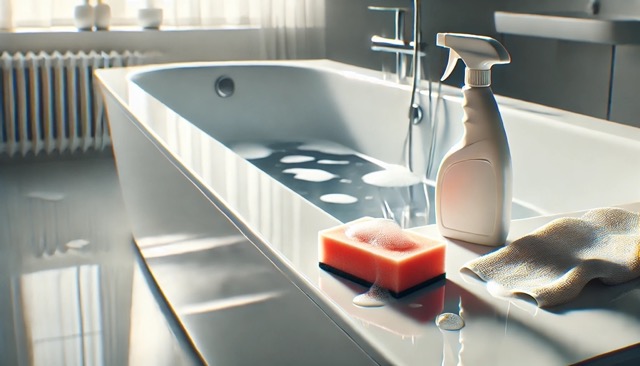
Suitable cleaning products for acrylic bathtubs
For acrylic, choose mild, non-abrasive cleaners specifically labeled for acrylic or plastic surfaces. Read ingredient lists and avoid chlorine bleach, ammonia, strong acids, and solvent bases. Gentle liquid creams and spray cleaners loosen soap scum without scouring the topcoat. When in doubt, test on a hidden area and watch for dulling or streaking after rinsing and drying. Homemade solutions can work, but they must be diluted and carefully spot-tested. An acrylic-safe routine balances efficacy against the risk of chemical or mechanical damage.
Recommended liquid products (use as directed):
- Cif Cream (non-abrasive). It lifts everyday residue without scratching and rinses cleanly from smooth surfaces. Apply with a soft sponge, then rinse and dry to prevent water spots.
- Sano Jet Bathroom. This mild spray cuts soap scum and body oils on acrylic without harsh fumes. Spray lightly, allow short dwell time, and wipe with microfiber.
- Frosch Bath Cleaner. An eco-forward formula that avoids ammonia while dissolving limescale gently. It is suitable for frequent use and supports a low-odor cleaning routine.
- Luxus Professional Acrylic. A specialized cleaner with antibacterial action designed for acrylic coatings. Use for weekly maintenance to maintain gloss and hygiene.
Homemade solutions (always spot-test first):
- Soap solution (warm water + liquid soap). It is ideal for daily rinses and light soil between deep cleans. Work in small sections and dry immediately to preserve shine.
- Vinegar + water (1:2). This helps degrease and reduce limescale in hard-water areas without abrasives. Keep contact time short on acrylic and rinse thoroughly afterward.
- Baking soda (spot use only). A light paste can address stubborn marks where liquids fail. Apply with a fingertip or very soft cloth and avoid broad, forceful rubbing.
- Lemon juice (diluted). It can add brightness and help break down light mineral film. Rinse well and dry to minimize any risk of etching.
What not to use on acrylic
Some products seem powerful because they smell strong or foam aggressively, but they can permanently mar acrylic. Chlorine bleach and bleach-based bathroom gels can discolor and embrittle the coating. Abrasive powders act like sandpaper and remove the glossy top layer, creating a haze that traps dirt faster. Strong alkalis (ammonia) and solvents (acetone, paint thinner, alcohol) can swell or craze acrylic. Steam cleaning or near-boiling water also stresses the material and may deform parts. Avoiding these categories is as important as choosing the right products.
Avoid on acrylic surfaces:
- Abrasive powders (e.g., Comet, Sarma). Their grit scratches the finish and permanently dulls the surface. Even “mild” powders can leave fine swirl marks visible in bright light.
- Chlorine bleach products (e.g., Domestos, Whitener). They can yellow or cloud acrylic and weaken seals. If bleach is ever used on silicone only, mask the tub and keep it off acrylic.
- Ammonia/strong alkali cleaners. They attack the polymer structure and degrade gloss. Residues also raise skin and respiratory irritation risk.
- Alcohol, acetone, or solvent cleaners. These can craze or soften acrylic and leave opaque patches. Solvent odors also linger and require heavy ventilation.
- Metal scouring pads and hard-bristle brushes. They gouge the topcoat immediately. Use only soft sponges or microfiber for contact cleaning.
- Steamers and very hot water (>70 °C/160 °F). Heat can warp panels and compromise adhesives. Stick to warm water and gentle chemistry.
Step-by-step cleaning guide
A methodical routine prevents damage and improves results while keeping labor low. Work from the cleanest areas to the dirtiest, and never let cleaners dry on the surface. Keep ventilation on and wear gloves to protect skin from prolonged contact with water and detergents. Always use soft tools: microfiber cloths, non-abrasive sponges, and a silicone squeegee. Finish by drying the tub completely, because standing droplets are the origin of water spots and limescale. Consistency matters more than intensity for acrylic care.
Algorithm (each step done gently):
- 1) Quick rinse with warm water. This removes loose soil and shampoo so the cleaner can contact the surface evenly. Start at the rim and push residues toward the drain.
- 2) Apply cleaner with a soft sponge or sprayer. Spread a thin, uniform layer without scrubbing. Avoid pooling in corners and around the drain.
- 3) Short dwell time (5–10 minutes max). Let chemistry loosen film instead of using force. Do not allow the product to dry out.
- 4) Light circular wiping. Use minimal pressure and refresh the cloth often. Replace grimy rinse water to avoid re-depositing soil.
- 5) Thorough warm-water rinse. Flush all residues, especially around fittings and the overflow. Any leftover film can look streaky when dry.
- 6) Dry with microfiber. This prevents spots and restores gloss. A quick squeegee before drying makes the job faster.
Removing yellowing and dullness
Yellowing and haze usually come from hard water, residual soaps, hair dye pigments, or incompatible chemicals. Treat stains early, because aged deposits bond more strongly to acrylic. Focus on chemistry and patience, not abrasion, to avoid thinning the topcoat. Increase ventilation and wear gloves when using acidic solutions, even mild ones. Rinse meticulously and dry to inspect progress under bright light. Repeat gentle passes rather than one aggressive attempt.
Effective options (use selectively):
- Diluted citric acid (1:5 with water) for spots. Apply with a soft cloth only to stained areas and wait a few minutes. Rinse, dry, and repeat if needed rather than scrubbing hard.
- Vinegar soak (tub full + ~1 L white vinegar, 6–8 hours). Useful for widespread mineral film on walls and floor. Drain, rinse thoroughly, and neutralize with a mild soapy wipe, then dry.
- Acrylic polish paste. Designed to revive gloss after light micro-scratching. Work in small circles with microfiber, then buff dry.
- Professional polishing for heavy cases. Deep haze and etched patches are best handled with machine polishing and graded compounds. This avoids removing too much material by hand.
Mold removal in seams
Mold thrives in damp corners and poorly ventilated rooms, especially on silicone joints, not the acrylic itself. Address it early to avoid deep colonization that stains sealant. Increase airflow by opening windows or running an exhaust fan during and after bathing. Keep the area dry after showers, and fix any leaks promptly. When using stronger mold removers, protect acrylic by masking or applying carefully with a cotton swab. Rinse quickly and avoid prolonged chemical contact on the tub surface.
Mold-fighting products (target silicone, protect acrylic):
- HG Mold Spray. An antiseptic formula that works quickly on early fungal growth. Spray precisely on sealant, keep off acrylic, then rinse and dry.
- Cillit Bang Black Mold cleaner. Effective for stubborn, older colonies on grout and silicone. Apply with care, ventilate well, and limit dwell time to reduce splash risk.
- Savo Mold Remover (chlorine-based). Reserve for severe cases on silicone only and mask the acrylic rim. Rinse immediately if any contact occurs with the tub surface.
- 3% hydrogen peroxide. A low-odor alternative that lightens mildew with less vapor. Dab onto seams, allow a short dwell, then rinse and dry.
- Baking soda + vinegar paste. A mild household option for fresh growth. Spread on seams, wait up to an hour, then wipe, rinse, and dry.
Prevention: keeping your tub clean longer
Prevention cuts labor dramatically and protects the glossy finish. Water left to evaporate forms limescale rings and encourages soap scum to harden. Daily rinsing and drying are the most important habits for acrylic care. Keep colored products in trays and avoid letting hair dyes or tanning lotions sit on the surface. Maintain good ventilation to reduce humidity that feeds mold. A quick weekly clean keeps buildup from crossing into “problem” territory.
Daily routine:
- Rinse the tub after each use. This removes soaps and minerals before they bond. Focus on corners, the drain, and under the overflow.
- Dry with microfiber. Wipe the floor and walls to stop water spots. A soft squeegee speeds up drying before the final wipe.
- Store products off the rim. Bottles can drip pigments that stain acrylic. Use a caddy or shelf to keep edges clear.
Weekly routine:
- Wash with a mild acrylic-safe cleaner. This resets the surface and refreshes gloss. Keep dwell times short and tools soft.
- Inspect seams and fittings. Early specks of mildew are easy to treat. Tighten any loose hardware and wipe away moisture traps.
- Clear the drain. Hair and residue slow drainage and promote ring buildup. A small hook or drain brush prevents clogs.
Repairing damaged acrylic surfaces
Minor scratches and tone unevenness can often be improved at home with the right products and patience. The goal is to refine the surface, not to remove material aggressively. Work in bright light and keep the surface clean and dry during polishing. Always start with the least aggressive method and escalate only if results stall. Deep gouges, spider cracks, or structural issues require professional attention. Document the tub brand and model; some makers sell matched repair kits.
Restoration options:
- Acrylic polishing paste. It reduces fine swirls and restores clarity. Apply in small sections, wipe clean, and evaluate before repeating.
- Restoration cream. Formulated for haze and light scuffing without abrasives. Follow label timings and buff to an even sheen.
- Liquid-acrylic repair kit. For chips or cracks, kits include filler and a spatula. Cure fully per instructions and finish with light polishing.
- Professional refinishing. Technicians use multi-step compounds and machines to level defects. This preserves more material and yields a uniform gloss.
Mistakes to avoid
Well-meaning shortcuts often cause more harm than good on acrylic. Scouring powders and stiff brushes remove the protective shine and invite faster soiling. Bleach, ammonia, and solvent cleaners can discolor or craze the plastic, and their fumes are harsh indoors. Letting cleaners dry on the surface creates streaks and residue that are hard to remove. Overheating with hot water or steam can warp panels and loosen seals. Keeping to gentle chemistry, soft tools, and short contact times prevents these issues.
Don’t do this on acrylic:
- No abrasive powders or pads. They scratch and matte the surface immediately. Even “one time” use can leave permanent witness marks.
- No bleach, ammonia, or solvent blends. These discolor and degrade acrylic and seals. Use acrylic-safe cleaners and rinse thoroughly.
- No steamers or near-boiling water. Heat can deform panels and stress adhesives. Warm water is sufficient when paired with proper chemistry.
- Don’t leave pigments or dyes sitting. Hair dye and makeup can stain quickly. Wipe accidents promptly and rinse well.
- Don’t scrub with pressure. Force thins the topcoat and creates dull spots. Let dwell time and chemistry do the work.
When to call professionals
If the tub is yellowed, deeply scratched, or patchy after DIY attempts, professional polishing or refinishing is cost-effective. Skilled technicians use graded compounds, dual-action machines, and liquid acrylic to level defects safely. Most cosmetic restorations take one to two hours and avoid the disruption of replacement. They also evaluate seals, drains, and fittings that may contribute to recurring issues. Ask for acrylic-specific experience and a clear description of steps and curing times. A successful professional job can extend the tub’s life by years.
Latest events in politics and global economy at Cryptonews – practical tips on how to act and invest. Read: Smart Home Technologies: How to Automate Everyday Life